Thursday, November 21, 2013

Lighting The Lanterns of Tea!


      Double digits post # 10


      I haven't got the next post of the monitor build ready yet so instead I figured I would start yet another build. This one is going to be a tea light holder of sorts.


      So I started this build with these two Tea light Lanterns. I found these lanterns A few years back when I had to clear out an abandoned apartment. they left a ton of stuff in the apartment including these things and I just grabbed them for some reason.


      So first thing was to take out the glas the was in the lanterns I plan on putting it all back in at the end However these lanterns are going to get painted and I don't feel like trying to paint around the glass. 

 
     Then I thought I might add these to the Monitor build maybe not but it could happen. So figured I am going to need something on these to make them look like they go with it incase I do add them to the monitor build. What I thought of was to drill some holes in the bottom. As you can see I drilled four small holes one in each corner.


     I then put a 5mm LED in each of the holes. The same red LED's used in the monitor build. This I rather like a lot. A few simple LED's and these dumb little lantern this look ten times better.


     That's As far As I got for now. I plan on doing more to these some time in the next few days most likely finishing then completely by my next post on them. I also think that I am going to add them to the monitor build.


   That's all for this post though hope it was enough to suffice.

    Like always thanks for reading and if you like what you see please comment rate and follow. it will give me more motivation to do more builds and posts.


Tuesday, November 19, 2013

Crank It Up!


        Post 9!


           Volume control Am I right?

            Whats a computer monitor with speakers build in it if you do not have full control over the volume of said speakers. Well with the speakers in my monitor project the idea of not having some type of volume control was just unacceptable to me. Also the idea of having some hum drum boring ol' volume knob was just as bad so it was time to do that thinking thing that I don't like doing all the time.

             My neighbor had a hole bock of clock parts that he let me rummage through,And I soon had a great idea. Why not make the volume control out of clock parts? This solve the problem of having some boring old knob hanging off the monitor somewhere. Also it solves the problem of this build not being "Steampunk-ish" enough? That and the hole control thing yada yada yada. So that what I shall do make the control knob into a clock work like crank system. BRILLANT!!!

             Not much more to say than that and I don't have any pictures of the process so here is a youtube video instead.


    After I made this video I made one last addition to the crank. I added a gear onto the crank to use as a handle so here is a picture of the finished crank.

      Hope you like it and as always thanks for reading.

       If you like what you see please Rate comment and follow for more builds. plus it will give me more motivation to keep building.

Monday, November 18, 2013

Flip The Switch!


         post 8


        Back to the Monitor. Now that the monitor was built and the roll top desk as made. I needed to figure out a way to turn on and off everything. The monitor On/Off buttons will no longer work with the way I had built the screen surround. But I didn't want to just add some lame buttons on the side. I thought about making the buttons to look like old Underwood typewriter keys, But could not figure out a good way to fasten them to the build itself. Nor could i figure out a way to make them look good and not out of place.

        A solution finally came to me as I was thinking of making new handles for my wood lathe chisels. I am going to make levers. That's right levers. The thought of a lever system seemed great to me it would give me a unique On/Off switch for the new monitor, and it would give it more of the Steampunk look that until
now was kind of lacking. The lever handles I spun down on my wood lathe and the levers themselves are made of 3/4" copper pipe.

        All the picture are of the switch box after it was made. Looking back now I wish I had some of the process of me making it but I think these will serve the purpose. To the right is the picture of the finished (not stained) switch box. At first it was for the ON/Off switch of the monitor. The lever closest to the camera or to the right in the picture below is for the monitor. This was a single button press that turned on the monitor and the same button press to turn it off. The lever only needed to touch contact to turn on and off the monitor. So knowing i didn't have to keep contact I put a spring from and old dishwasher door on it to pull it back to the upright position every time you pull it. This works remarkably well and I think it gives a very Steampunk look and feel to this lever.

        Next I needed a lever to turn on and off the Speakers that are built into the side of the monitor. The furthest lever from the camera in the picture above or the one on the right hand side of the picture to the left turns on and off the speakers. Now this one did need to have a constant contact. What was on the speakers originally was a toggle switch. so this lever rises up and stay in the upright position when on. to turn it off you simply return the lever to the lying down position.

         The knife switch in the center of the two levers runs the lights in the roll top desk. These lights were purely cosmetic. They serve no purpose at all but to look cool. I think they pull it off quite nicely. I do plan on putting more LED's under the desk put that is going to have to wait till I make the legs. The legs build is still a few post out yet, But I can assure you that they will be pretty cool themselves.

        The picture to the right is taken of the underside of the lever box. I felt like putting this one in the post just to show that all the working of the switches were made by hand and have no mass produced modern crap attached to them. As you can see all the power contacts are made simply by touching one peace of copper with a wire attached to it to another. This takes the place of the switches and completes the necessary circuit to turn on and off the devices they are running.

         Please excuse my extremely messy work station.
         Here is how the project looks after the switch box was done and attached to the side of the desk.
This is where it will stay I didn't ant the switches to impede on the rest of the workings of the desk and the future additions to it. So off to one side was a good decision for me. Also I just like the idea of throwing levers to turn it all on in a mad scientist sort of way. (I know I'm a dork)  If I have any more ideas of something else I am going to add to this I might in fact add a few more levers. But for now this is how she sits. Ready to be brought to life with the throw of a lever. Now if I could just figure out how to get that obligatory crash sound from all the old mad scientist films to play when i turn on and off the computer that would be amazing.

         Below is a video I made of the Levers in action


       Again thanks for reading and if you like what you see please subscribe, rate and comment. any feedback is good feedback. And it will give me more motivation to keep building and Blogging.

Saturday, November 16, 2013

Lamp shade filler project.


       Post lucky # 7


               This is a new build I started just for the blog trying to stay ahead of myself. it is the beginning of a full lamp I plan on making. This post is all about the Shades.


        So in the video it shows pretty much everything I'm about to write but hey I'm going to write it anyways. I made this like I said to keep busy on builds for this blog. I first started with a roll of 3/8 soft copper tubing, and some scrap copper wire. All stuff I had lying around in the basement for no good reason.

     I started by bending the tube into rings of three different sizes. The small ones are to fit around the light socket. The medium ones are just for a transition to the big one. The big ones Are the full size of the shade. I was going to solder these together with the wire, but my torch is out of gas. So instead I drilled eight holes in each ring a feed the wire through them.

      I twisted the wire around each one of the rings once so to keep them at the right spot and make it so they could not move. Then I just went one ring at a time till they were all put one and twisted into place.

      The lamp shade really isn't much of a shade at all. but they look pretty cool after this I plan on making a full lamp post for them. I still don't know yet if I'm going to make them into two different lamps or into one lamp that splits of into two lights. However I do know that it is going to be all make of copper, brass, and wood. That won't be till I get a new tank of gas so I could solder them all together.  Like I said this was a quick easy build. To be the start of a new project. As soon as these are done they will most likely be up on ebay because I have no use for more lamps in my house Unless they come out looking really cool then it might be hard for me to part with them.


Again thanks for reading and if you enjoy my blog please give it a thumbs up and follow for more builds.


Friday, November 15, 2013

A top to roll.

        Post 6


          Hello..... Interwebs!
 
          Roll top desk. Just saying that make you think Antique, and that is the exact reaction that I wanted. Now as I said before I never made a roll top desk before and had no clue where to begin with it. However I remembered one that my aunt Lisa use to have in her kitchen. When I was a kid I was fascinated with it and how it worked. Sounds kind of funny now being older because well there really is nothing to it. But either way I remember that the strips of wood that made up the tambour were connected together by a piece of canvas. The "tambour" is the part of the desk that slides up and down. So that's where I should start with a piece of canvas. Problem was I didn't have any canvas. I began ransacking my house for a piece of cloth like material that would not stretch at all. This went on for hours every piece of cloth I found was somewhat stretchy. Then I found it a pillowcase that I no longer used it was good size and did not stretch at all.

          This cloth was my starting point I cut it open and laid it out flat, trying to find how big I was going to make this tambour. Finally I decided that it didn.t need to be much bigger than the room needed for a keyboard and mouse pad. I began routing strips of wood and cutting them off with the table saw. I used a piece of 1x6 and just kept going till it was gone. Then I use just regular wood glue to glue it to the fabric and let it sit overnight.

       Now I don't have pictures for all the steps I made for this part manly because it was done before I started this Blog. But after I let that set up over nigh I cut nice and square and Had to make the two sides with the rails. the way I did this was purely guessing at the radius I thought would work and holding the tambour to it to see if it would roll nicely. Luckily for me it only took me one try. Not impressive at all I know but still didn't waste any time on it. After that I use a 3/4" plunge cut router bit and set the fence on my router to 1" with the plunge depth of 3/8".


         The top and bottom rails were cut to get about 1/8" leeway for the tambour to not bind on the way up and down.

     
        After it was all put together I wired up four 5mm red LED's to go under the tambour. I kept the red to match the LED's in the monitor seeing how this is going to be one piece. This is where the keyboard and mouse will slide out of on drawer slides. The keyboard and mouse are going to be projects for the future.

 
       Thats about all there was to the rolltop desk portion of the project. I wish I had a little more to explain or show for it, but that part was pretty self explanatory. the legs and the rest of the bottom to the desk will be more of a project then the desk itself so stay tuned for that. there is some cool stuff I'm doing with the legs.

       Either way thanks for reading and hope you liked my blogging still trying to get used to typing these things out every day.

Don't forget to Follow and rate. It will give me more motivation to keep doing this. or you know you could tell me I suck and that will give me more motivation to keep doing it in the effort to troll you Either way feedback is more than welcome.


Thursday, November 14, 2013

Current Project.


        Post # 5


        After the (not so) Laptop was ruined and never got finished I took a break from trying to build things. With money being tight and other personal things going on I didn't have much time to build nor the motivation. This went on for some time until my neighbor bought these clock housings from a garage sale. When I saw them it was a light bulb moment because all I could think about was how cool the would look as Speaker housings. Well turns out at that point in time my Neighbor was unwilling to part with them. Luckily for me I just bought a new wood lathe and need something to do with it. I began making my own Speaker Housing from scratch  with the overall design inspiration taking from these clock boxes.

             After getting into the project of the speaker boxes My wife and I went to a second hand store. This is where I found a Flatscreen computer monitor for about $12. Needless to say I could not pass up that deal however I didn't have any use for another screen. Yet again the little hamster in my brain started running on his wheel. (Thats a metaphor for thinking you see) I came up with this idea that I was going to rebuild the monitor out of wood and attach the speakers to the either side of the monitor.

       I began by taking apart the monitor peice by peice and scraping every Plastic or unneeded part I could. Again this was a very fast part of the build seeing how I wasn't concerned in ever putting this thing back together the way it was. The monitor came apart very easy a few clip and screws and it almost falls apart in your hands.
        Then started the stage of mocking everything up to fit. The speaker housings that I had made had a slightly more Gothic look to them than a Steampunk look. However I was ok with this because I love the look of gothic architecture. At this point I thought that I would make this a Steampunk computer monitor with a Gothic feel to it. This seems to me like it was a good fit because it two things I really like merged into one.


   Here you can see the Monitor surround beginning to take shape with the speaker housings attached to the sides. With a limited wood supply at the time I had to make due with what I had. Hence the few different colors of wood. the Speaker housings are wrapped with the same red velvet and brass tacks I was using on the roundtop laptop.
      
           With the top part of the screen surround being done mocked up I started thinking of little detail things to Jazz it up a bit. The top seemed very plain and boring so I made a little trim peace that I cut out and routed  with a colonial bit to give it a little more Gothic styling. I left A gap behind it where I put some more of the faux red velvet. The speakers were part of a powered speaker/subwoofer combo that when turned on Had a little blue LED that light up. Now with the red velvet I didn't think that a Blue LED would look very good, so I switched it out for four red 5mm LEDS. With the top center piece being raise up off the back panel a little bit I gave me a perfect place to put some lights. Now when the Speakers are on the Center Corbel has a nice little glow from the backside. It looks great in a slightly darker room but with a well lite room it's not so easy to make out.


           Next the Speakers needed a little love in the way of corbels. Without the corbels they looked to be just floating on the side of the monitor, and that just did not look good at all. Again trying to stay with the Gothic feel I made this set. 


        With the speaker corbels done I attached them to the bottoms of the speaker housings. As you can see it give it a much more finished look. This was where the work on the Monitor stopped it still needed to be stained,but for now it was done. The next step was to make a desk for it to set on. However I was beginning to fear I was losing the idea of a Steampunk computer. So the only solution was to make the desk the monitor was to set on much more Steampunk in character. There was only one way I could think to do that, and that was with a roll top desk. Now I don't have the money to blow on a antique roll top desk to start cutting into and potentially messing up, So I would build one, but I've never built a roll top desk before so I was in for an adventure.

      That is were I will pick this back up tomorrow so until then take care and thanks for reading.

Wednesday, November 13, 2013

The Lost (not so) Laptop.


    Post count 4

    I think I'm getting the hang of this Blogging stuff.


     Today's blog entry is all about my third build the one I loved the most yet never finished [/sadface].
So after getting more and more into this steampunk thing, I started coming up with ideas. Yes I know again the Laptop is not super original, But I wanted to make one. but I didn't have any unused laptops. Nor did I have any money to buy one that my wife would let me rip apart. So this idea stayed on the back burner for quite some time. Meanwhile I still thought about it, Thinking to myself what would I do had I got the chance to make it. Would I try to make it out of brass? Should I try and make it out of nothing but wood? The ideas kept coming but no progress was made with no laptop to pull apart non of these ideas would come to fruition.

     Then one day it happened the thing I have been waiting for. I was sitting in the living room using my laptop. I get up to use the bathroom and from the living room I hear it. "BOOM"  "What the heck was that?" I ran out of the Bathroom to find my laptop on the floor in two pieces with my cat standing over it with a smug look on her little kitty face. "Well that sucks." I said and then LIGHT BULB! my chance has come to make my ideas finally into a real thing. "YAY!!!"

     
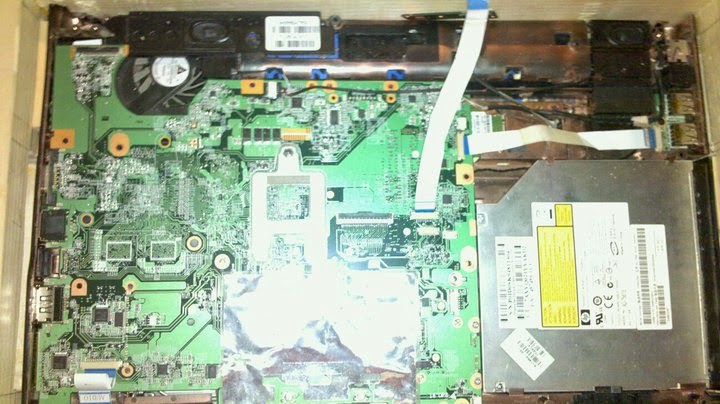
      So the Building Started. First I ripped out all the guts of the laptop. You know it's funny how quick thing can come apart when you are not worried about putting them back together. Luckily for me only the hing that connected the screen to the bass was damaged, Everything else was still intact and in proper working order. After getting everything pulled apart and disassembled it was time to start the build.

        I started by building a base for everything to sit in. I drilled holes where the fans where to let air through, Which oddly enough was sufficient and ultimately lead to the laptop overheating and burning up the hard drive. At least that's what I was told I'm not very good when it comes to computers. I lined up portholes for all the USB slots and the charger and all that good stuff.


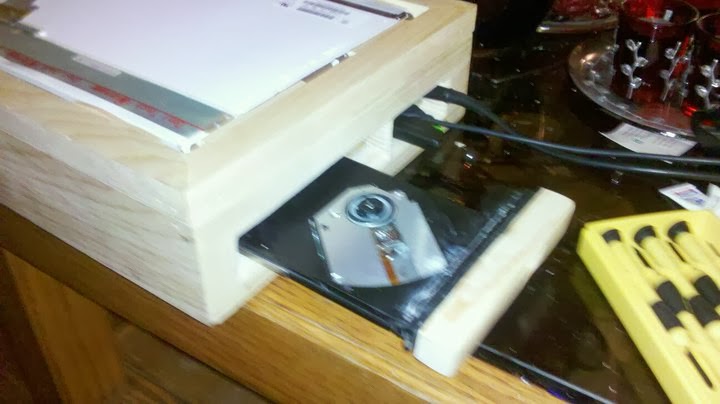
         The CD tray was the next hurdle. I wanted it to be very hard to see when closed but work perfectly. this was a challenge that outwitted me. The face of the drawer fit perfect into the slot. However when attached to the drawer itself there was just enough play in the drawer slide that it would get hung up. so I went it and sanded down the imperfections, and tried again. Kept doing that till the slide work perfect, But now it was plain as day the it was two pieces. So I ripped it off and tried again. this drawer slide was pulled apart and redone three times and at the end it was function over form and never got to the point that it looked like one piece of wood.

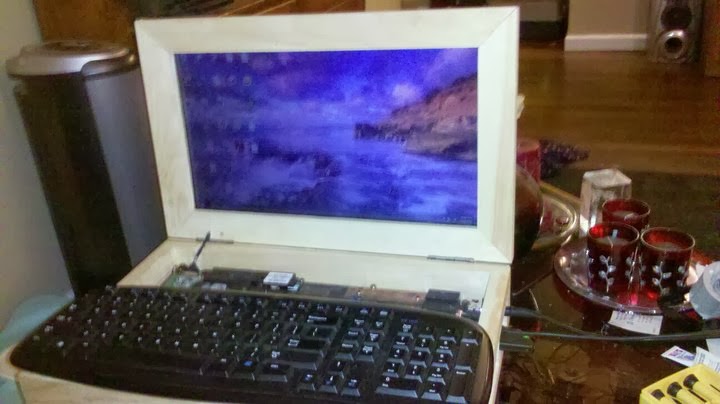
      Next came the monitor. This was one of the easiest part of the laptop to make. It was got a frame build around screen. The back of the frame would get rabbeted out to accept the screen and hold it in place. Two hinges would let the screen open and shut the same as a normal laptop.


        Then to start adding the Brassy bits. nothing says Steampunk more than brass. I started finding little brass pieces in every hardware store, home depot, and lumber yard I went to. It became a joke at work whenever I would go into the lumber yard or hardware stores the guys would be shocked if I walked out without some sort of brass hardware.


     Once you start adding brassy things its Hard to stop. The chains that I put on though were actually needed. Without the chains on the screen there was nothing to stop it from slamming backwards and potentially breaking the screen. So those worked out great.


      After that I had to pull it all back apart and Stain it. I used a minwax color named Jacobean. It gave the piece a nice antique look. Also it complemented the brass really well.


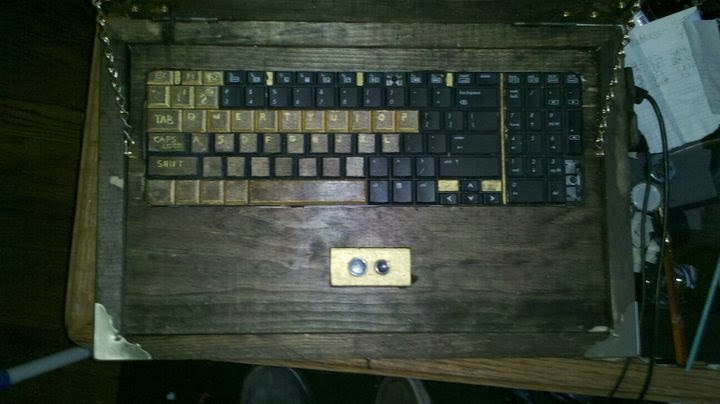
         Up next was the key board this was a struggle to say the least. I through around a few Ideas in how to do this. First was these Script font stickers I found. I though about putting them on top of wood and then polying over them. Then I tried Script decals with the same technique, and that didn't work either. Finally I settled on free hand painting. Problem is I'm not a good painter. and the paint I use was some weird brass colored paint that would just peel right of of everything I put it on. so the keyboard had me quite discouraged. and I decided to move on for now and come back to it at a later time. hoping that by then I would have come up for a solution for my lettering problem.

        Then I got a new job and all my side projects went on hold for a bit. When I came back to it I decided to put red velvet wrist rest on. But this also was a day that I did a lot of drinking the beer. If you know what I mean. They didn't come out bad for my level of intoxication, But they could have been much better. I finished them on a different day because you would believe how much one could bleed from a pin prick after being drunk for a few hours.


       THE TOP!
       One of if not my most favorite parts of this hole build. Again went back and forth on a few ideas for the top of this thing. Finally I settled on making it into a round top chest. I figured this would give it more of a Victorian era feel to it. And well looking back on it, It seems a little more pirate-y. But hey pirates are cool. Anywho when I pulled apart the computer I never came up with a good way of changing out the battery so instead of worrying about it  I just Left the batty out of the equation. Which is fine because after this the portability of this particular laptop is less than it once was. You are not going to be sitting in Starbucks writing your new book on this thing. But I plenty of planes on doing just that when I finished it. Minus the book part.


 Leaving the battery out was ok but now you needed to be plugged in at all times to use the laptop. So we now need a place for all these cords that have to stay with said laptop. Another cool part of the round top was that it opened up for storage. Pretty cool right? Again I was lining this part with the same red velvet that was used for the wrist pads. It was coming along great this laptop toke me a few months of work. couple hours here few minutes there but it was finally coming together and looking good.

        Sadly this is where the story of the (Not so) Laptop comes to an end. More of a screeching halt. Remember when I said that I didn't drill enough holes for sufficient air flow? Yeah this is the point where I found that out. So like I said the ports for air flow were not good enough to let in and out the right amount of air. The system overheated and fried the hard drive. So this project was scraped I started it when it was my only computer and I needed a way to put it back together in one piece. By time it died I already bought a new computer and had no need for this one. If I had money to put into it for a new hard drive and all the fun stuff needed to run it I might have finished it but now it sits in the dungeon of my basement till the day I have the time and money ti pull it back out and rehash the hole thing.

      Hope you enjoyed this installment of my Steampunk Journey.
      And thanks for reading.

Tuesday, November 12, 2013

Post three. Build two.


         Good morrow Interwebs!

         Day three of said blogging adventure.

       
          Continuing my journey into the realm of  Steampunk. At this point I was hooked! Also though not 100% happy with it  I finished my first build. So by this point all I can keep thinking is, What else can I build? What would look really cool "Steampunked"? Trying to think of stuff that hasn't been done before is almost pointless at this point, Mainly because there is just so many Builds that have been done all over the world.
So originality is pretty much out the window for most people. However that is the beauty of Steampunk, no one cares if you make something that has been done to death as long as it is unique.
       
          USB flash drives are made every day. If you were to do a google search you will find thousands of them. I had a Flash drive just sitting around doing nothing, so the day that I had to reformat it I figured why not remake the whole darn thing. This one i ripped apart and rebuilt in about five minutes. I started by popping it open and getting rid of all the plastic pieces. Because plastic is bad.


         I wanted to keep the size roughly about the same as it was. Also I wanted to make sure that the little accent light will still be seen. When you plug it in it glows orange. Also when it fully connects to your PC the orange LED has a rolling dimming that looks great behind the gears. Now like I said this was build in about five minutes it made of Balsa wood, Brass tin, Faux gears I found at the craft store and super glue.

       Now this was my second Steampunk build and its pretty obvious that my skills with working on small things still was not the greatest. But that didn't Stop me I was still way to hooked on the Idea of a Steampunk world. I still wanted to make every and anything I could Steampunk. The next thing I moved onto was laptop but thats another story for another time.

       My next blog post will be about tsaid Laptop but until then I leave with a Quick video of my USB flash drive. Thanks for reading.

Monday, November 11, 2013

Take two


So Second post of my new Blogging endeavour.
More of a continuation of the first post.  

After finding all this Amazing Steampunk stuff online I'm hooked. I felt like I needed to be involved in this, I need to try making my own "Steampunk" life. Yet I didn't know where to begin and I had literally no money that I could put towards it. So I started finding things around the house and at work. Started collecting random parts and pieces of anything that was brass or copper.

This went on for a few months, till I had a good size pile of just pure junk. Needless to say my wife didn't quite like this new found hobby of mine. I began thinking of what I could build or put together. I liked that Altered art and Steampunk sculptures and things of that nature, But what I really liked was the ones that could be used. The Computers, Keyboards, Nerf guns, Lamps and other Household things that have been converted to this faux steam powered look. So like I said I was thinking really hard of what I could do for a while. One Day I was shooting one of my pellet guns in my basement (low powered pellet guns) when it hit me. I've seen people make Nerf guns but never any real guns or pellet guns. Sense this day I have found quite a bit of both but at that time I never seen any. 

I started by painting some of the pieces on the gun with a brass colored paint. And that didn't look that great. So then I started Grabbing some of the scrap copper I had collected and spent a few Hours drilling holes and bending copper taking it apart over and over. finally ended up with a weird looking pellet gun that looks neither good or steampunk it just looks dumb. Keep in mind this is my very first attempt at making any "steampunk" project here are some pictures. 


I know it's not good. but hey it was my first Steampunk prop. This pistol is still a fully functional Pellet gun. The gun runs off 12g CO2 tanks, and takes 22 cal. pellets. Funny thing is that this was also the very first pellet gun pistol I've ever bought. In the future I plan on taking this thing back out and redoing some of it maybe adding more to make it more Steampunk looking and less of just crap thrown together. But for now that how she sits.

 Now I was happy with this build for all about ten minutes. Then I stepped back and said "Wow that looks dumb!" so I put it away. I still shoot it every once in a while but its not a very good looking gun/build. I have still yet to try and make this one look better or try building a new gun at all. Maybe in the future but for now I'll let it rest.

My next project and theme of my next post was a USB thumb drive I put together. I shall post that within the next few days.

Thanks for reading.


Sunday, November 10, 2013

The beginning!

Hello Interwebs.

I've never (air quotations) Blogged before so my apologies if this sucks.
Also my grammar leaves much to be desired.

Anyway lets begin,
I stumbled upon this amazing world of  "Steampunk" about Three years ago. For any who doesn't know what Steampunk is,or doesn't know how to use google. Steampunk is like a mash-up Victorian/industrial revolution era merged with modern technology. Imagine if you will all the technology you use today, But made with turn of the century methods. In other words your Iphone its still an Iphone but instead of a lithium battery it runs of steam power. Pretty cool right? Anyways three years ago I first heard of steampunk. I was taking back by the amount of information and shear number of people who were into it on the internet. Although we should never be surprised of what one could find on ye ol' interwebs, I was still baffled that I've never heard of Steampunk till then.

Now at the start My friend who goes by Miller was the one who told me about this. He had gone to a renaissance fair for a wedding (I know Awesome right?) and saw a man there who goes by the name of "Datamancer". Now this man is quite a well known individual in the Steampunk community,And has a lot of Amazing things he has built and sells. Here is a link to his Website. Miller told me all about these computers and crazy contraption this man built and was selling. Well that sparked my interest and I had to look it all up as soon as I got in front of a computer.

What I found had me floored. This world of Steampunk is so odd, Yet it seemed right. It was impractical yet much more intriguing then that which was practical. None of it made sense and still was (with the exception of my children and wife) some of the most beautiful thing I've ever seen. Well needless to say I was hooked.
I started looking up Steampunk creations everyday. And dreaming of what the world might be if the world of steampunk was the norm. And now still some was of a novice I have began to create my very own Steampunk creations.

So with that being say, This blog will be About my journey and a journal so to say of my quest to engulf my life with the Beauty that is Steampunk.